|
Billboards: People, Trees, Signs, etc |
  
|
|
Billboards: People, Trees, Signs, etc |
|

Some of the trees and people supplied with PartyCAD are just digital images. In computer graphics lingo these are called "billboards." Many of these are automatically rotated to face the camera as you move about in the View Editor, but rotation is an option and so you can use the same 'billboarding' technique to create signs, rugs, building facades and scenic backdrops.
Billboards come in two varieties: vertical or horizontal. Vertical billboards are used for people, trees, backdrops and most signs. Horizontal billboards are good for rugs or maybe place settings on a table.
Instructions for Creating Billboards
Acquire the Picture
Take a picture of an item or scene you want to convert to a billboard. For vertical billboards, you should take the picture at eye level so it will look its best when people walk by it in virtual reality. For horizontal billboards, take the picture looking straight down at the object.

Edit the Picture
Get a good paint program, install this on your computer and become familiar with its operation.
Two of the most popular are PhotoShop and PaintShop Pro, but there are many others to choose from. Paint.NET is free and very capable, but there is a fairly steep learning curve. Microsoft Paint, which comes with Windows, was upgraded in Windows 7 and is now more capable than in former versions but is still missing some needed tools, especially if you wish to work with transparent colors.
1. Load the picture into the Paint program.
2. Crop the image so only the part you want of be a part of the billboard remains.
3. Proportionally resize the image so it is about 500 pixels along its longest dimension. For higher quality renderings you might want to go with a larger image, say 1200 pixels, but this may slow down PartyCAD's virtual reality module, depending on how capable your system is.
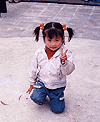
4. Carefully color areas on the picture which you wish to be transparent area with a color that does not otherwise occur in the picture. Make sure that the upper left pixel in the image is this color as that is where PartyCAD looks to find the transparency color for BMPs.
When you have completed the above steps your image will look something like the one above.
Save the Picture
Save the picture to your desktop or to any other known location on your computer. The format of the picture is important... you can save the picture as a .BMP, .JPG or .PNG file.
.BMP - saving to a .BMP creates a much larger file than the other options, but it is an exact copy of the picture. If you have painted out transparent areas in the picture with a color, make sure the upper-left pixel of the picture is the same color, as this is how PartyCAD determines the transparency color for .BMPs
.JPG - saving as a .JPG is easy to do and causes the image to be compressed to a small file size, but because of the compression of the file, transparency will not work if you save as a .JPG.
.PNG - saving as a .PNG also creates a compressed image but a capable paint program will allow you to specify a transparency color as part of the saving process, and PartyCAD knows how to use this information. .PNGs are the best pick for saving if you can figure how to set the transparency color.
Setting up a Billboard in PartyCAD
There are lots of easy little steps to this process. After a time or two they will become second nature.
Run PartyCAD 12. Start a new project or reload one to which you want to add a billboard. Then,
1. Go to the Design Editor
2. Go to the Party Gallery, find the Virtual Reality section and load a Vertical or Horizontal Billboard into your design.
3. Click the color box beneath the piece name (BILLBD or BILLBDH) to bring up the Select Color/Texture menu.
4. Click the Select Textures button to bring up PartyCAD's Pictures in ... menu.
5. Click the My Art button to display the pictures in your My Art folder.
6. Click the Import Picture button to bring up the Import Picture menu.
7. Click the Copy a Picture from a File button, browse to your picture on disk and double-click it to open and display it in the Import Picture menu.
8. Click the Import Picture button to import the picture into PartyCAD. You will be asked to enter a name. Any short name will be fine, but it is important the name end with either a ^ or a %:
If the name ends with a ^ character, any billboard using the picture will automatically rotate to face the camera. Examples: GIRL^, MYTREE^
If the name ends with a % character, billboards using the picture will not rotate to face the camera. Examples: MySign%, BackGrd%
Once you have entered the name, click OK to add the picture to your My Art folder where it will be available for use in creating as may billboards as you like.
9. Double-click the picture in the list of available pictures at the left of the Pictures in My Art menu to return to the Texture menu where a part of the picture will be displayed.
10. Click OK to associate the picture with the billboard.
Using the Billboard
You will now be back at the Design Editor and will see the piece name has changed to indicate the picture you specified in step 8. You can now size and position the piece as desired and it will appear in your virtual reality views. Notice though that the icon for a vertical billboard is shaped like the letter "T." The leg of the "T" indicates the front of the billboard. This is important to know in positioning non-rotating vertical billboards as these are only visible from the front. Your best plan will be to place such billboards against something, unless they are simply to be the backdrop of a view.
3D People
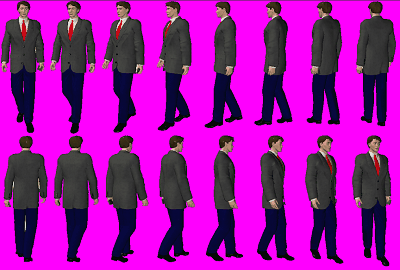
You can also make 3D people from multiple images though it is a very laborious process. First take 16 picture of a person as they rotate 360 degrees. The more accurate you are in taking these pictures, the better will be the end result. Next, combine the pictures into a single image file. This will take hours to do. Now save the image as described above, but name the file something like LITGIRL-F8X2.PNG This tells PartyCAD that there are eight images per row and two rows in the file. Once you have saved the file, you can proceed as with a normal rotating vertical billboard. For the name in step 8 take off the stuff after the dash and add a caret(^)
If anybody actually makes their own 3D People, I would be very interested in seeing the result!