|
Entering Numbers |
  
|
|
Entering Numbers |
|
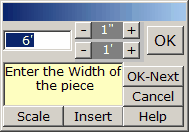
A small number entry menu similar to the above will often appear when you click on a white box containing a number in PartyCAD. The purpose of the menu is to let you enter a number in many different ways. The Scale, Insert and OK-Next buttons only appear under certain circumstances, but the rest of the menu is always available for the entry of dimensions and other needed numbers.
You can:
Type in a number or a measurement and press the enter key or click the OK button. Measurements can include single (') and double (") quotes to indicate feet and inches. Metric units of measure can include M and C to indicate meters and centimeters.
Click the + and - buttons at the top, center of the menu, or press the + and - keys on your keyboard to incrementally change the value of the number. In some parts of the program, such as when setting the size of a piece in the Design Editor, doing this will also cause a change in the display of graphical elements of your design. If you are using the keyboard, hold the Shift key as you press + or - to change using the larger incremental value.
Note: you can click on the increment values (1" and 1' above) and input values that you prefer.
If OK-Next appears, clicking this button, or pressing the Enter key on your keyboard, will take you to additional size input menus. For instance, typing the width of a piece in the Design Editor and then pressing the Enter key will take you to a menu requesting the Depth of the piece.
Clicking the Scale button indicates that you want to proportionally scale the whole piece as you change the size of one of its dimensions. This results in an effect sort of like inflating a balloon.
Clicking the Insert button indicates you want to do an Insert resize. This is a special type of sizing for pieces of furniture. Examine the drawings below:
![]()
At the left is a normal CAR, just as it comes from the standard furniture library. Using normal sizing, this car was duplicated and lengthened to give the middle car. See how the increase in length has been spread over all of the features of the car? Sometimes it is preferable to insert the entire size change at one place in the piece. The stretch limo at the right was created by sizing the standard car with the Insert option.
When you click the Insert button, a menu appears that allows you to setup for the size insertion operation.
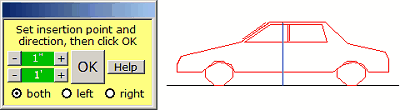
The blue line on the current piece is the insertion line. Click on the + and - button in the menu to move the line to the desired location. Points will be pushed left, right or in both directions from this line, depending on the option you click at the bottom of this menu. Once you have made your choice, click on OK and proceed with the size change as described above. Watch the piece as you change the size to see what is happening.
Note: when reducing the size of a piece using the Insert option, the program will let you shrink only so far. This protects you from messing up the piece with an inappropriate size change, but can be frustrating. You can usually overcome this problem by repositioning the insertion line and trying again.