|
Fill Menu |
  
|
|
Fill Menu |
|
Watch the Using Fill online video.

The Fill Menu allows you to quickly fill a room with table and chairs, just chairs, or with any other piece of furniture. To set up for using fill:
- Load or select the piece to use in filling. You can select a group of pieces if you like.
- Rotate the piece if you wish.
- Position the piece at the upper left corner of the area you want to fill.
- Click ![]() the Fill button. This is located at the top right of the Design Editor menu.
the Fill button. This is located at the top right of the Design Editor menu.
A sub menu similar to the one above will appear, except the red fill box will be smaller.
Click down and drag on the green dot at the lower-right of the fill box to change its size. As the box gets big enough, duplicates of the fill piece will be added.
The Fill Options panel at the right controls how and when the duplicates are added.
Drag on the red dot at the upper-left of the fill box to reposition all of the fill pieces.
When you are happy with the result, click the OK button to add the displayed pieces to your design.
Or, click Cancel to cancel the filling operation without adding the fill pieces.
Fill Options
The Fill Options at the right of the fill menu control the filling process in various ways.
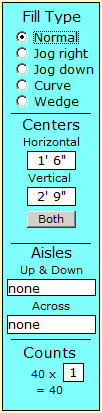
Fill Type
Click the radio buttons described below to select the desired fill type:
Normal will arrange the fill pieces in a rectangular grid.
Jog Right will jog every other row of fill pieces to the right by half the amount specified in the Horizontal Center section. Rows will be spaced vertically so that all pieces are spaced the Horizontal Center distance away from each other. This type of fill is most useful for making staggered seating arrangement with round tables, such as was done with the 5RT8C piece in the illustration at the top of this topic.
Jog Down works exactly like Jog Right, but columns instead of rows of the pieces will be staggered. Experiment a little and you will quickly see the difference.
Curve allows you to curve rows of seating by dragging on a yellow dot that appears when you select the option. As above, the green dot controls the number and width of such rows. If you only need to curve rows of chairs a small amount and want to keep rows of such chairs in a box-like conformation, the Curve fill is for you. For more radical curves, check out Wedge below.
Wedge works exactly like Curve if you have just one row of chairs. But, if you drag down on the green dot to add additional rows, you will quickly see the difference between the two styles. Wedge adds additional rows along an increasing wedge shape, and with very little fiddling (reduce the number of chairs per row by dragging the green dot to the left) you can generate multiple rows of chairs in a nearly circular pattern.
Centers
These data boxes allow you to specify how far apart the fill pieces are to be placed.
The Horizontal Center is the distance from any point on a piece to the same point on its neighbor to the right.
The Vertical center controls vertical spacing in similar fashion.
Common settings for centers are automatically selected for pieces like tables and chairs, but you can change these to suit your needs.
For other pieces, you will usually have to enter the center distances before you can get the desired fill result.
Often, the horizontal and vertical centers are the same. To change both centers to a desired value, click the Both button that appears when both types of centers can be changed (see the illustration below.)
Aisles
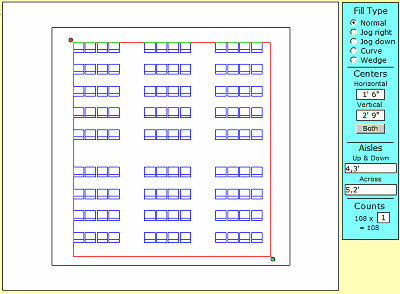
Often, in doing large seating arrangements, it is necessary to leave aisles for ease of access and for safety reasons. The Aisles data boxes allow you to do this. Examine the illustration above.
The Up&Down aisles box has been set to 4,3' This tells the program that after every 4 chairs there is to be a vertical 3' aisle.
The Across box is set to 5,2' which says that after every 5 rows of chairs there is to be a horizontal 2' aisle.
If you need more complex aisle schemes, just add more pairs of counts/widths to the data boxes. For instance, setting Up&Down to 4,3',6,8' will work just fine. First will come 4 chairs, then a 3' aisle, then 6 more chairs, and finally an 8' aisle. After that, the aisle pattern will repeat. Of course the fill box will have to be fairly large for you to see the effect of such a complex aisle pattern.
Note: When using aisles with the jogged fill types, the aisles along the jogged dimension wiggle in and out because of the jogging of the pieces. Only rarely would such aisles be of any practical value.
Counts
Fill automatically keeps track of the number of pieces and sub-pieces in the fill area. In the illustration above, you can see that 108 chairs have been created. There are no sub-pieces with chairs, and so the number of sub-pieces per piece is reported as 1.
In the illustration at the top of this topic, tables and chairs were used to fill a room. The counts section there looks like this:

Here, each table has 8 chairs associated with it, and so the sub-pieces box shows 8. This happens with all table and chair pieces commonly used with fill.
So the entire count section can be read as... 23 x 8 = 184, which means the fill box contains 23 pieces, each with 8 chairs, for a total of 184 chairs.
The number of chairs in your entire design is always reported in the Title Bar located at the top of the Design Editor. This count will be continuously updated as you make adjustments in the Fill menu.
Note: The red Fill pieces are not actually added to your design until you click the OK button.