|
Design Editor |
  
|
|
Design Editor |
|
Watch the Overview of the Design Editor online video.
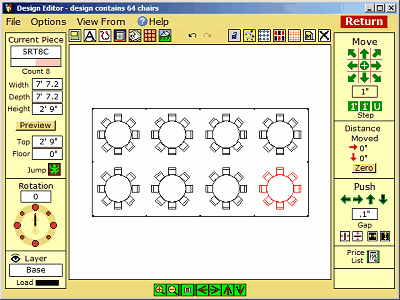
Piece Controls Top Buttons Zoom Buttons
Movement Buttons Price/List Button Menu Bar
Introduction
When you click Edit Design in the Page Editor, the design for your project will be displayed in the Design Editor. Here you can make changes to the design and to the plan upon which the design is built.
The best way to master the Design Editor is to watch the online videos that explain its operation.
In PartyCAD, a design element is called a "piece of furniture", or more simply, a "piece". A chair is a piece, a set of tables and chairs is a piece, a tent is a piece, a person is a piece, etc.
The center of the Design Editor menu displays a view of your design, its plan and its furnishings. The currently selected piece is shown in red.
One way to move the current piece is to click down on it with your left or right mouse button, drag it to the desired position and then release the mouse button.
To select a different piece, click on it. You can also click the N or B keys on your keyboard to step through all the pieces in the design.
Most of the commands that are available in Design Editor are used to manipulate individual pieces or groups of pieces of furniture, and are not available until you have selected a piece. Each of the command buttons, and their keyboard shortcuts, are described below, but, before getting to the details, lets explore the layout of the menu:
The Piece Controls to the left of the menu allow you to examine and change the color, layer, size, rotation and height off the floor of the current piece.
The Top Buttons at the top of the menu perform various functions. Those at the left can be used to modify your plan or load a new piece of furniture. At the center are the undo/redo buttons that allow you to easily escape from mistakes. At the right are more advanced buttons that allow you to lock a piece in place, duplicate it, replicate it to fill an area, group pieces together, display an alignment grid, measure distances and to kill the current piece.
The Zoom Buttons Below the plan are a set of green buttons that allow you to zoom in and out on a portion of the design, and to pan the zoomed area. There is also a button here that will refresh the screen view of your design. If you click Options/ Show More Buttons, additional buttons are displayed here that facilitate the viewing of your design and simplify certain piece creation functions.
The Movement Buttons The command buttons at the right of the menu are generally concerned with the movement of the currently selected piece.
The Price/List Button Below the movement buttons is a single button that allows you to see lists of the furnishings used in your arrangement or price the event based upon information you supply.
The Menu Bar This is at the top of the menu and gives access to less frequently used capabilities of the Design Editor.
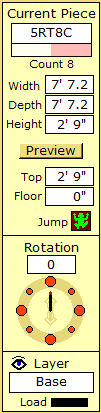
Name - The name of the currently selected piece is displayed in the Current Piece box. You can click on this box to change the name if you wish. The name of each piece in your arrangement and its size are used by the Price/List logic. Names with certain formats receive special handling. A piece named NODRAW (video) will not be drawn by will be colored. Also see: Billboards.
Color - below the name, the colors for the piece are displayed. Click on a color to change it using the Color Selection menu.
Count - this line indicates how many pieces in your design share this piece name. At the very top of the menu, in the title bar, you can also refer to a running count of the number of chairs and booths in your design.
Size boxes - the size of the piece is reported in these boxes. Click on these to change a dimension.
Preview button - click this to see what the piece will look like in 3D views. This is a handy way to check that a piece is colored correctly.
Top box - this indicates the height of the top of the piece above the floor. Click to change.
Floor box - this indicates the height of the bottom of the piece above the floor. Click to change.
![]() Jump button - The Jump button changes the height of the current piece of furniture above the floor. If you are viewing your design from the top, you will not see a change in the display when you click the Jump button, but if you watch the floor and top height, you will see that these values do change in response to a Jump. If you are viewing your data from the front or side when you click Jump, you will readily see what this button does. Jump is the easiest way to place one piece of furniture on top of another, and you will find yourself using it frequently.
Jump button - The Jump button changes the height of the current piece of furniture above the floor. If you are viewing your design from the top, you will not see a change in the display when you click the Jump button, but if you watch the floor and top height, you will see that these values do change in response to a Jump. If you are viewing your data from the front or side when you click Jump, you will readily see what this button does. Jump is the easiest way to place one piece of furniture on top of another, and you will find yourself using it frequently.
Using Jump:
1. Click on the piece that is to be on the bottom, say a table, to make this the current piece.
2. Click on the piece that is to be on top, say a lamp, to make this the current piece.
3. Click the Jump button and the program uses the top height of the previous piece to change the floor height of the current piece to match.
Pressing Jump multiple times handles various special cases --- jumping a piece to match the jumped up height of the previous piece, and re-placing the current piece on the floor. Jump seldom gives trouble, but, if it does, you can just enter the desired Floor or Top height into the appropriate box or switch to a front view and adjust the height of the piece by dragging.
![]() Attract button - this appears instead of the Jump button if both the current piece and the previous piece are tents. Clicking this button causes the current tent to be rotated and aligned with the previously selected tent. This can greatly speed the creation of multi-tent layouts. See here for more.
Attract button - this appears instead of the Jump button if both the current piece and the previous piece are tents. Clicking this button causes the current tent to be rotated and aligned with the previously selected tent. This can greatly speed the creation of multi-tent layouts. See here for more.
Piece Rotation Section - The amount the current piece has been rotated is reported in the Rotation box. You can rotate the current piece or group by:
-- clicking the Rotate box and entering the degrees of rotation directly
-- clicking the orange dots in the direction rosette to rotate the piece or group to a common orientation.
-- dragging up and down on the direction rosette with the left mouse button.
If you have selected a group (see below) and use the right mouse button with any of the above methods, only the master piece will be rotated. See Working with Groups
Layers section - This allows you to place pieces on different layers for more complicated designs. See Using Layers for full details of operation.
![]()
![]() Edit Plan - allows you to edit the plan related to your design. This is commonly used to increase the size of a simple lot or to apply changes to a 3D floorplan such as adding wallpaper.
Edit Plan - allows you to edit the plan related to your design. This is commonly used to increase the size of a simple lot or to apply changes to a 3D floorplan such as adding wallpaper.
![]() Load Label - causes the Text Editor to appear, where can enter a label to be added as a piece of furniture to the design. You can size and rotate labels just as you would any other piece. Labels always have a piece name of LABEL. You should not change this if you want to control the visibility of labels in 3D views. To edit an existing label, simply right-click it in your design.
Load Label - causes the Text Editor to appear, where can enter a label to be added as a piece of furniture to the design. You can size and rotate labels just as you would any other piece. Labels always have a piece name of LABEL. You should not change this if you want to control the visibility of labels in 3D views. To edit an existing label, simply right-click it in your design.
![]() Create Drawn Part - causes the Drawing menu to appear, where you can add lines, arrows and dimensions to your design. The Drawing menu can also be used to create many kinds of 3D furniture for use with PartyCAD... see the Making Furniture videos. Once you have created and saved a drawing, it becomes part of your arrangement. To edit such drawings, right-click on them.
Create Drawn Part - causes the Drawing menu to appear, where you can add lines, arrows and dimensions to your design. The Drawing menu can also be used to create many kinds of 3D furniture for use with PartyCAD... see the Making Furniture videos. Once you have created and saved a drawing, it becomes part of your arrangement. To edit such drawings, right-click on them.
![]() Load Custom Piece - causes the Party Gallery menu to appear and display your available custom pieces. Custom pieces are those which you create and save in addition to those supplied with PartyCAD. See the Making Furniture videos for information on how to do this.
Load Custom Piece - causes the Party Gallery menu to appear and display your available custom pieces. Custom pieces are those which you create and save in addition to those supplied with PartyCAD. See the Making Furniture videos for information on how to do this.
![]() Load from Album - causes the Furniture Album to be displayed. Here you can select and load additional pieces into your design.
Load from Album - causes the Furniture Album to be displayed. Here you can select and load additional pieces into your design.
![]() Load from Gallery - causes the Furniture Gallery to be displayed. This is an alternate way of loading one or many pieces into your design.
Load from Gallery - causes the Furniture Gallery to be displayed. This is an alternate way of loading one or many pieces into your design.
![]() Tent Wizard - brings up the Tent Wizard, where you can easily load tents from the tent library, or construct and edit your own.
Tent Wizard - brings up the Tent Wizard, where you can easily load tents from the tent library, or construct and edit your own.
![]() Undo/Redo - the Undo and Redo buttons undo your last operations, or redo an operation you have undone. Your last 100 actions are remembered, but a Save will reset the buttons. You cannot Redo all operations. The program will warn you of such situations.
Undo/Redo - the Undo and Redo buttons undo your last operations, or redo an operation you have undone. Your last 100 actions are remembered, but a Save will reset the buttons. You cannot Redo all operations. The program will warn you of such situations.
![]() Lock/Unlock - show the locked status of the current piece. When locked, a piece can be selected, but it cannot be moved. Click this button to change the locked status of the current piece.
Lock/Unlock - show the locked status of the current piece. When locked, a piece can be selected, but it cannot be moved. Click this button to change the locked status of the current piece.
![]() Duplicate - duplicates the current piece or group. You cannot immediately see the duplicate since it will be sitting directly on top of the original, but the color change of the current piece from red to blue will tip you off that you are looking at a duplicate that is ready to be moved to its proper location.
Duplicate - duplicates the current piece or group. You cannot immediately see the duplicate since it will be sitting directly on top of the original, but the color change of the current piece from red to blue will tip you off that you are looking at a duplicate that is ready to be moved to its proper location.
![]() Fill - brings up the Fill Menu, which is used to quickly fill a room with tables and chairs and to perform other repetitive duplications of a piece.
Fill - brings up the Fill Menu, which is used to quickly fill a room with tables and chairs and to perform other repetitive duplications of a piece.
![]() Select Group - allows you to select and work with groups of pieces. See Working with Groups
Select Group - allows you to select and work with groups of pieces. See Working with Groups
![]() Break Group - appears below the Select Group button when the current piece is a group. Click this to break a group into its constituent pieces or sub-groups.
Break Group - appears below the Select Group button when the current piece is a group. Click this to break a group into its constituent pieces or sub-groups.
![]() Grid - controls the display, sizing and placement of a grid of lines that may useful in certain alignment situations. Left-clicking the Grid button turns the grid on and off. Right-clicking allows you to set the size of the grid squares and to drag the grid to the desired position on the screen.
Grid - controls the display, sizing and placement of a grid of lines that may useful in certain alignment situations. Left-clicking the Grid button turns the grid on and off. Right-clicking allows you to set the size of the grid squares and to drag the grid to the desired position on the screen.
![]() Measure - brings up a menu that allows you to measure distances in your design.
Measure - brings up a menu that allows you to measure distances in your design.
![]() Kill Piece - deletes the current piece or group from the design.
Kill Piece - deletes the current piece or group from the design.
![]()
Below the design is a set of green buttons that allow you to zoom in on a part of your design; refresh the screen; and pan the screen image while you are zoomed in.

Move Section - The buttons in the Move section allow you to move the current piece very precisely using an increment amount box, arrow buttons and a + button.
If you click on the 1" button, then click on the arrow buttons or press an arrow key on your keyboard, the current piece will move 1 inch. Click ![]() or press the + key to change the move increment to 10 inches.
or press the + key to change the move increment to 10 inches.
If you click on the 1' button, then click on the arrow buttons or press an arrow key on your keyboard, the current piece will move 12 inches. Click ![]() or press + to change the move increment to 10 feet.
or press + to change the move increment to 10 feet.
If you click on the ![]() button, then each click on the arrow buttons or press of an arrow key on your keyboard will move the current piece the distance that is displayed in the box above. Click
button, then each click on the arrow buttons or press of an arrow key on your keyboard will move the current piece the distance that is displayed in the box above. Click ![]() or press + to multiply this distance by 10 for coarser moves. You can set the User move increment to any value you like by clicking on the box containing the increment value.
or press + to multiply this distance by 10 for coarser moves. You can set the User move increment to any value you like by clicking on the box containing the increment value.
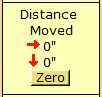
Distance Moved section - This shows how far the current piece has been moved since it was last selected. you can zero this distance at any time by clicking the Zero button. The distance moved is useful for those situations where a piece must be positioned a precise distance away from another piece or from a wall.
Distances on the screen can be measured directly by clicking on the Measure button described above.

Push section - Push movement is the capability of the program to move a piece of furniture up, down, left or right until it hits a wall or another piece of furniture. To try push movement, just click on one of the arrows in this section. The current piece will be moved in the indicated direction until it hits something. A small gap is often left between objects to assist in hidden line removal. Typically this is set to .1" as in the illustration above, but you can set it to 0" for no gap, or 12" to leave a foot-wide gap, if you should so desire. Push may not work well on some oddly shaped pieces.
Four other closely related buttons are part of the Push section. Two buttons center the current piece from left-to-right and from top-to-bottom by automatically doing a Push in the two directions and then splitting the difference to place the piece.
The other two buttons are like the center buttons, but change the size of the current piece to fill the right-to-left or top-to-bottom space between the current piece and its neighbors. The gap value is used to determine the precision of the fit.
![]()
Check all parts and price lists you produce with PartyCAD - see Disclaimer
The Price/List button is quite sophisticated. See the Working with Lists and Prices video for an explanation of its use.
![]()
File
Save as Piece... - allows you to save custom pieces of furniture to your library. See the online videos relating to creating furniture to learn more.
Save & Resume... - allows you to quickly return to the Page Editor, save your work, and then come back to the Design Editor to continue work on you design. This is used to quickly backup your large design as you create it and protects against loosing unsaved work.
Load Design... - allows you to load an old fashion .ARR file into your design.
Delete All Furniture - deletes all furnishings from your design.
Export Furniture List... - allows you to save a list of the furnishings in your design to an ASCII .lis file.
Save As PDF - saves the current design as a PDF file. Background pictures are not saved as part of the PDF.
Save As Bitmap - saves the current design as a bitmap that can be used by word processors and publishing programs. The saved bitmap will be exactly the same size as that currently displayed on your screen. You can size the Design Editor window to adjust the size of this window before saving.
Save As JPG - similar to Save as Bitmap but save the image to a jpg file.
Save As DXF - saves the current design as a dxf file that can be loaded by most CAD programs.
Copy to Clipboard - copies the design area of the menu to the Windows clipboard.
Edit Piece... - brings up the Edit Piece menu, which allows you to edit the current piece in various ways. This is seldom used even by true PartyCAD enthusiasts.
Edit Piece Special... - provides additional options for loading the current piece into the Piece Editor.
Hide Background Picture - hides the background picture if one is present.
Exit - terminated the Design Editor and returns you to the Page Editor.
Options
Show Simple Plans on Pages - if checked causes simple plan lines to be included in the design item on related pages.
Break all Groups - causes all grouping data for pieces in the design to be discarded. This is useful if grouping data somehow becomes corrupt.
Delete All XXXs - removes all copies of the currently selected piece from the design.
Show Info - shows the names of the plan and design you are currently working on, along with the piece count. This information is shown in the title bar at the top of the Design Editor.
Job Data allows you to set a Customer number and a Transaction number for a design. This is passed via a file to rental management software packages for further processing.
Show More Buttons - Adds View From, Edit and Save Piece buttons to the viewing buttons along the bottom of the Design Editor window.
Remember Piece's Colors - causes the coloration of the current piece to be remembered and used every time that piece is loaded in future.
Use Piece's Default Colors - causes the piece to revert to its default coloration.
Find Piece - causes a find menu to appear where you can type in the name or part of the name of a piece and click OK. The program will then search for the piece you have specified. If found, that piece will be made the current piece. The Find button is useful for finding "lost" pieces, and for locating all occurrences of a particular piece.
Grow Trees causes the Grow menu to be displayed if the current piece is a tree or other "growable" object. This menu allows you to grow individual trees or entire landscapes.
Refresh Plan Automatically - attempts to keep the plan perfect at all times by doing frequent refreshes. This can be irritating if you are working on a large design, but it a delight if you are working on a design with a dark background picture.
View From - usually it feels as though you are working on a 2D design in the Design Editor, but this is not the case. Use this item to view your design from the front, left, right or back.
Help - shows this help.