|
Making Web Pages |
  
|
|
Making Web Pages |
|
See the Making Webpages online video
In the Page Editor, clicking File > Make Web Page brings up the Make Web Page menu, where you can create a web page for the current project.
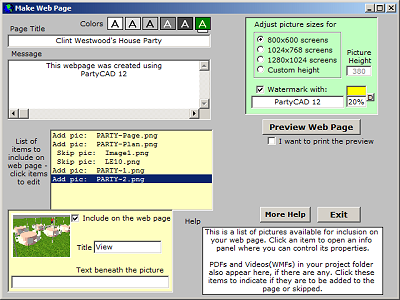
When you move your mouse over a control in this menu, the Help box at the lower right changes to provide immediate help on that control. You can figure out nearly everything you need to know about the menu just by using this feature, and so in this Help we will concentrate on the overall capabilities and limitations of the web page making process.
The Make Web Page menu allows you to set the background and foreground colors of your finished page. A bar under one of the Colors buttons shows the current selection. You cannot currently select other colors or any but the default Verdana font for your web pages, but there is a way around that we will discuss later.
Beneath the Colors buttons are boxes where you can type in the Page Title and a Message that is to appear beneath the Page Title on the finished web page. Page Title is a single line of text, but Message can be as long as you like and will automatically be formatted for a pleasing appearance. You can force a line break in the message by pressing Enter while positioned where you want the break to occur.
Next comes the media list; a list of items you can include on the finished web page. This list is created automatically when the menu first appears and you cannot add to it except by closing the menu and making changes to your page. The list contains PNGs of the images on your PartyCAD page.
PNG (Portatable Network Graphics) files are graphics file created by Make Web Page when it starts by grabbing the page. The first item in the list is always a PNG for the entire page. This is followed by additional PNGs, one for the design and each of the views on the page.
When you click a PNG in the media list, a sub-panel appears below the list. This shows a thumbnail of the selected PNG and provides: a checkbox to control weather the PNG is to be skipped or added; a box for specifying a Title; a box for entering the text that is to be displayed beneath the picture in the finished web page.
That completes the items on the left side of the Make Web Page menu.
A green panel at the upper right is used to set web page characteristics. Here you can set the size of the PNGs and add a Watermark if you so desire. A couple of boxes to the left of Watermark let you set the watermark color and density. A "D" button lets you easily return to the default values.
Next comes Preview Web Page. Click this when you are ready to preview your page. You must always preview, since it is this step that creates your web page using the settings described above. Once the page has been created, your browser is started to show the finished product. On some machines, the preview may not automatically be displayed, but it will always show up in the task bar at the bottom of your screen, where you can click to display it.
Once you've had a look at the web page, close your browser to return to the Make Web Page menu. If you want to make changes, go ahead and do that now, then preview again. If you are happy with the web page, you are now ready to save.
Once you have previewed a web page, a "Save Page As" menu appears. There are various choices here which you can read more about by hovering your mouse over each, but in brief you can select from the following:
MHT (MIME HTML) - This technology stores an HTML web page and its related graphical content into a single file.
EXE (Executable) file - This is a program file and may cause security concerns on some systems. The EXEs produced by Make Web Page, however, are just self extracting Zip files that allow the various files in your web page to be automatically organized into a folder.
Zip files - This is a way to archive many files into one. To unzip such files, you must have appropriate software, and for this reason you would not want to email this sort of file to a novice.
Folder. This option causes the web page to be saved into a folder on your machine. If you have a web page creation package on your machine, you can then use it to make modifications to the PartyCAD created page.
The only other thing to know is that you have control over if PartyCAD saves the changes you have made when you exit the Make Web Page menu. If you exit by clicking the Exit button, your changes will be saved. If you exit by clicking ![]() at the top-right of the menu, your changes will not be saved.
at the top-right of the menu, your changes will not be saved.