|
Page Editor |
  
|
|
Page Editor |
|
Watch the Quick Start online video.
Menu Bar Items - Printing, Making Movies, Websites, Watermarks, etc.
VR Module Failed to Create Picture
Introduction
If you open any file with an extension of .pcad on your disk, or if you open or create a project in the PartyCAD's Start Menu, the Page Editor will appear to display a page related to the specified project.
A page usually contains many different items, any of which can be selected by clicking. When you click on an item, a panel appears at the left of the menu to show the available options.
Pages
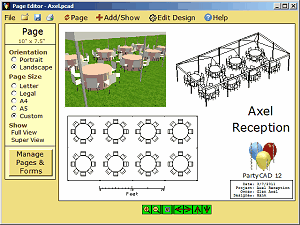
If you click between the items or click Page in the Menu Bar at the top of the menu, the page is refreshed and the panel at the left changes to show Page related options... you can change the page size or orientation, and use the Full View and Superview options to zoom in and out on the whole page, thus facilitating the rearrangement of parts when a page is resized or reoriented.
A Manage Pages & Forms button allows you to add to or manage the pages related to a project and to set up forms containing your logo, company name and other standard information that can automatically be applied to newly created projects. A project can have up to 6 pages associated with it, but most projects have only one.
Design Item
Each page contains one and only one design. In the Page Editor, the design looks like a 2D floorplan of the event and is often located at the lower left of the page. It is possible to hide the design, but visible or not, it is still present in the project and is intimately involved in the production of your final results.
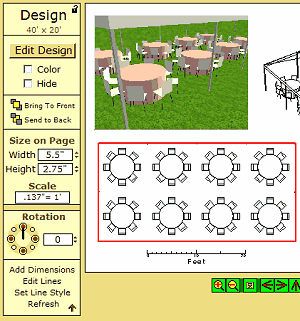
If you right-click on a design, the Design Editor will open to allow changes. If you left-click on a design, a Design panel appears at the left of the screen. This contains the following items and controls:
Lock button - this tiny button at the upper right of the panel will lock the design in place on the page so it cannot accidentally be moved. Click the button again to unlock the position of the design.
Plan Size field - this reports the size of the design in real-world units of measure. You can change this by editing the plan in the Design Editor
Edit Design button - takes you to the Design Editor, where you can modify your design.
Color checkbox - apply or removes color to the design. A recently added Tops checkbox controls the coloring of tent tops.
Hide checkbox - hides the design. If you hide a design, any related Scale item will be hidden as well. To restore a hidden design, click Add/Show in the menu bar and then click Show Design. To edit a hidden design, click Edit Design in the Menu Bar.
Bring to Front/ Send to Back buttons - these buttons control the order in which the design is drawn on the page relative to other page items and are used to control the inappropriate overlapping page items. You can see how the page will look when printed by clicking Page in the Menu Bar at the top of the screen.
Width/Height boxes- these boxes control the size of the design on the page. Notice the small up/down arrows to the right of these boxes. These arrows indicate you can drag on the box to dynamically alter the value in the box, or if you prefer, you can simply click on the box and set the size manually if more precision is required. Any white box in PartyCAD can be modified by clicking, but only those with the small up/down arrows can be altered dynamically.
Scale box - click this box to set the print scale of the design to a precise value.
Other, less frequently used, Design options:
Note: if you are running PartyCAD is a small window it may be necessary to click the ![]() button at the bottom of the panel to see these options.
button at the bottom of the panel to see these options.
Rotation section - though rarely used, this section allows you to rotate the design by modifying the value in the white box or by clicking/dragging on the directional rosette.
Add Dimensions - allows you to add dimensions relating to the design to the page. See here.
Edit Lines - allows you to remove unwanted lines from the design. See here.
Set Line Style - allows you to set the line thickness, style and color of the lines used to draw the design on the page.
Refresh - refreshes the screen.
View Items
Though not required, most people include one or more 3D views of their designs as part of each page they create.
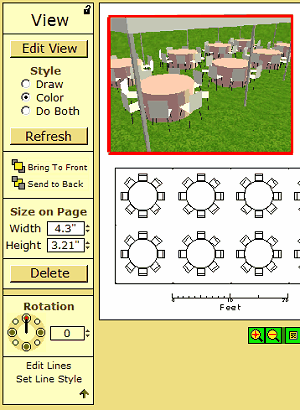
If you right-click on a view, the View Editor will open to allow changes to the view. If you left-click on a view, a View panel appears at the left of the screen. This is much the same as the Design panel described just above except for the following additions:
Edit View button - transfers control to the View Editor, where the view can be modified in a variety of ways.
Style buttons - these provide gross control over the look of the view. Clicking Draw results in a line drawing, clicking Color gives a color only view (sometimes called a rendering.) Clicking Do Both results in a color view overlayed with a drawn version of the same view.
Delete button - deletes the view from the page. Clicking a view to select it and then clicking Delete key on your keyboard has the same effect.
Adding a New View - to add a view to a page, click Add/Show in the Menu Bar and then click Add View.
Scale Item
Often times it is helpful to include a drawn scale as an item on the page to give some sense of the size of a design.
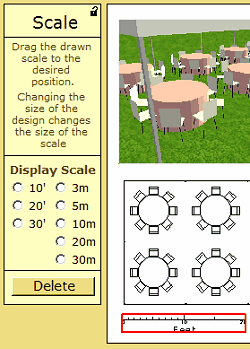
If you select the scale, the Scale panel opens a the left of the menu. Here you can click a button to select from the available scales, or click the Delete button to remove the scale from the page. To add a scale if none exists on the page, click Add/Show in the Menu Bar and then click Add Scale
Text Items
Nearly every page will contain some text items.
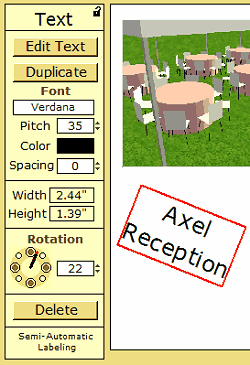
Right-clicking on any text item will bring up the text editor. Left-clicking will cause the Text panel to appear at the left of the menu, where the following controls are available:
Edit Text button - transfers control to the Text Editor.
Duplicate button - duplicates the text.
Font box - changes the font of the text.
Pitch box - changes the size of the text.
Color box - changes the color of the text.
Spacing box - changes the line spacing on multi-line labels.
Width/Height boxes - report the size of the text on the page. You cannot modify these directly unless you have selected one of the Hershey fonts. For more on Hershey fonts, see below. For most fonts, changing the Pitch box changes then size of the text on the page.
Rotation section - controls here are used to rotate the text.
Delete button - deletes the text from the page. To add text, click Add/Show in the Menu Bar and then click Add Text
Semi-Automatic Labeling button - generates table numbers in a semi-automatic fashion.
Hershey Fonts - Among the fonts listed when you click the fonts box you will find a number of fonts beginning with the work Hershey. These are special vector fonts that PartyCAD handles differently than any others. When great precision is required in the placement of text, it is recommended you use one of the Hershey fonts. Hershey 1 is the one I prefer.
Picture Items
Any art you like can be added to the page. Art is just a copy of some picture somewhere on your computer and will not be affected by changes you make to your design. Very often, pictures are used to display company logos on a page.

The Picture panel which appears when you click a picture is very similar to the Design panel described above.
To add a picture to the page, click Add/Show in the Menu Bar and then click Add Picture
Lines Items
It is infrequently used, but PartyCAD can add drawn lines to the page.
To add lines to the page, click Add/Show in the Menu Bar and then click Draw Lines
To edit existing lines, click on the lines and the Lines panel appears at the left of the menu:
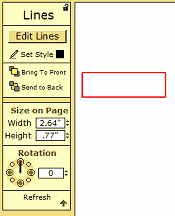
The available options are much as has already been described above.
![]()
The Menu Bar at the top of the Page Editor contains many useful functions. File is the most complicated of these, so we will cover that last. The other items are:
![]() Close Project - clicking this closes the current project and returns you to the Start Menu
Close Project - clicking this closes the current project and returns you to the Start Menu
![]() Save As - clicking this allows you to save the currently loaded project under a different name.
Save As - clicking this allows you to save the currently loaded project under a different name.
![]() Print - clicking this causes a PDF file of the current page to be created and opened in your PDF viewer software. From there you will usually print, email or save the PDF file. If you right-click this button, the Print Menu will appear, where you can set various printing options.
Print - clicking this causes a PDF file of the current page to be created and opened in your PDF viewer software. From there you will usually print, email or save the PDF file. If you right-click this button, the Print Menu will appear, where you can set various printing options.
![]() Page - clicking this refreshes the page and shows just exactly how the page will appear when printed.
Page - clicking this refreshes the page and shows just exactly how the page will appear when printed.
![]() Add/Show - clicking this allows you to add items to the page or show a hidden design.
Add/Show - clicking this allows you to add items to the page or show a hidden design.
![]() Edit Design - transfers control to the Design Editor, where you can make changes to your design.
Edit Design - transfers control to the Design Editor, where you can make changes to your design.
![]() Help - displays this help.
Help - displays this help.
![]() File Button
File Button
Clicking the File button in the Page Editor gives access to some of the more powerful features of PartyCAD 12. Here is a list of what you will find:
New - opens a second instance of PartyCAD 12 so that you can create a new project without closing the currently open project.
Open... - opens the specified project in a new instance of the PartyCAD 12 program, so you can work on two designs simultaneously.
Close - closes the current project and returns you to the Start Menu
Save - saves the current project
Save As... - saves the current project under a different name. This is generally used when you want to make alternate designs.
Print... - opens the Print Menu, where various print options such as borders, annotations, watermarks, and lists/reports can be requested.
Show Grid - shows/ hides a grid which may be useful in laying out your page.
Set Grid... - allows you to configure the grid.
Save Screen Image... - saves a screen image of the page. This may be good for web pages, but is of too low a resolution to print well. Use Print for high resolution output.
Preferences - sets various page related preferences:
Keep text in front - text will always be placed in front of all graphics when a page is printed.
Snap - sets the attraction level of dots which are part of the drawing process.
Arrowhead Size - sets the size of arrowheads created with the draw command.
Make Web Page - transfers you to the Web Page Creation menu.
Make Movie - transfers you to the View Editor in a special way that allows you to create WMV videos of your design.
Exit - Stops the program.
To measure distances on the page:
1. Hold down the Alt key on your keyboard.
2. Click on the starting point of the measurement. Do not click within the design.
3. Move the mouse to the ending point… the distance moved is reported in the Page Editor’s Title Bar.
4. Repeat steps 2 and 3 as required.
5. Release the Alt Key to stop measuring.
To measure scale distances on the design associated with a page:
1. Hold down the Alt key on your keyboard.
2. Click on the starting point of the measurement. Make sure to click within the design.
3. Move the mouse to the ending point… the scale distance moved is reported in the Title Bar.
4. Repeat steps 2 and 3 as required.
5. Release the Alt Key to stop measuring.