|
Using Layers |
  
|
|
Using Layers |
|
Watch the Using Layers online video.
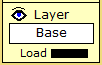
If you examine the left side of the Design Editor menu, you will notice a Layer section that looks much like the one above. Each piece of furniture in your design can be assigned to one of twenty layers. Using layers may simplify designs where you want to present alternatives. Layers can also be used to mark parts of your design as unselectable. This is useful if, for instance, you are done designing the tents in your design and now want to work on the interiors of the tents. Moving the tents to an unselectable layer makes it impossible to select a tent with an accidental mouse click.
The illustration above shows that:
--- The current piece is assigned to the Base layer and the color of that layer is black since the color of the word Base is black.
--- New pieces you load will be put in the layer whose color is black - i.e. the Base layer
--- The eye at the upper left indicates that all layers are currently visible. If you set a layer to be invisible, the eye will change to look like this: ![]()
Working with layers:
If you click on the layer name, or the eye in the Layer section; or if you click the Select Group button, select a number of pieces and then click Set Layer, the Layer Menu will appear:
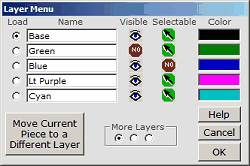
This menu allows you to control the layers in your design. Here is how:
Load - at the left of the menu are the Load radio buttons. One of these will have a dot in it, as with the Base line above. This marks the layer as being the load layer. Any new piece of furniture you load into your design will be place on the load layer.
Name - each layer has a name associated with it. By default these names are either Base, or the color that the pieces of that layer will be drawn in on the Design Editor screen. You can, however, change the layer names to more useful terms such as Electrical, Tents, Dance Floor or whatever you like. To do this, just select the name box with your mouse and type in the desired name.
Visible - this column indicates if a layer is to be visible or invisible - just click to change back and forth. Invisible layers will not be shown in the Design Editor, or in any views you create. They will also not be displayed in the Page Editor. Also, the names of the pieces on invisible layers are not saved to the internal piece lists used by the Price & List Menu.
Selectable - this column indicates if the pieces on a given layer are selectable in the Design Editor. Click to change back and forth. Making a layer unselectable can speed the design process as discussed above.
Color - this is the color of the lines that will be used to draw pieces on a layer in the Design Editor. Different colors make it easy to distinguish between the pieces on the different layers. This coloring will not be seen in the final designs you load into the Page Editor. Click on a color to change it. You can have multiple layers with the same color if you wish. Bright red and bright blue are poor choices for layer colors, since these colors are used in the Design Editor to indicate the current piece and a recent duplicate of the current piece.
Move Current/Selected Piece to a Different Layer - clicking this big button allows you to select the layer to which the current piece or the selected pieces are to be moved. A little submenu will then appear, and you can select the desired destination layer.
More Layers - there are 20 layers available. Click on these radio buttons to see them all.