|
Networking PartyCAD |
  
|
|
Networking PartyCAD |
|
PartyCAD 12 cannot be run from a server or an attached USB drive, but the program can store your projects and other program related data in these places as in the illustration below. The word 'server' is used in the diagram, but this topic applies just as well to attached USB drives or to a public networked drive on another computer.
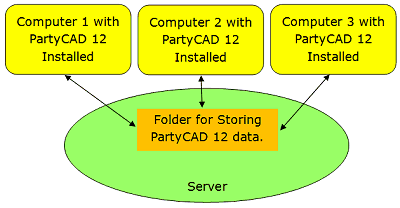
Because the program relies upon DirectX and other technologies that are inherent on a particular machine, PartyCAD must be installed on each user machine and cannot be run remotely from a server.
PartyCAD cannot be run from dumb terminals attached to a server.
PartyCAD can, however, store and maintain the projects you create on a server or other remote storage location.
Setting Up a Server as a PartyCAD Storage Location
To setup PartyCAD to save its data to a server:
1. Before running PartyCAD, use Windows to get onto the server and create a folder where PartyCAD data is to be located. For instance, you might create a folder named:
\\ServerName\Public\PartyCAD12 Data
On some systems, mapping the network drive to a drive letter on the local machine may improve performance. If you do this, use the mapped drive name when entering the folder location in the My Storage Locations menu. For instance, if drive letter S is mapped to \\ServerName\Public the folder name to enter into PartyCAD would be:
S:\PartyCAD12 Data
2. Make sure the folder on the server has full permissions enabled. PartyCAD will need to read, write, create and remove files and subfolders within the server folder.
3. Install PartyCAD on the local computer if you have not done so already.
4. Run PartyCAD and click Manage Locations.
5. Point the Remote folder to the server folder created in step 1. Do this by clicking the Browse button to the right of the Remote box, then navigating to the server folder. When you get there, click Save and the path to the server folder will appear in the Remote box... or you can enter the location directly in the box.
6. Click the Use this Location checkbox for the Remote folder to tell PartyCAD to check for and make use of the server folder.
7. If all user data including projects, forms and templates are to be stored on the server, uncheck the other Use this Location checkboxes and click OK.
Repeat steps 3-7 on each machine that is to use the server as its storage location.
Refer to Managing Storage Locations to learn the meaning of the other items in the Locations Menu. Understanding these will allow you to set up storage options in many different ways.
Moving Existing Data to the Server
If there are forms, templates, furniture or projects on the local machine that you would like to now be available on the server, simply move the local files to the matching location on the server. On the local machine look in Documents for a folder named My PartyCAD Files.
-to move projects, just copy the .pcad files from the local folder to the folder setup in step 1 above.
-to move forms, templates, etc., copy the _Resources folder from the local folder to the folder setup in step 1 above.