|
Color and Texture Selection |
  
|
|
Color and Texture Selection |
|
Watch the Working with Colors & Textures online video.
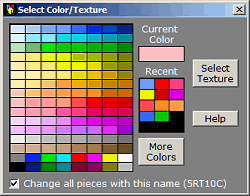
The Select Color/Texture menu is used to select the colors and textures applied to pieces of furniture and to the walls and floors of 3D floorplans. This menu can be reached from various points within the program, and depending on what is allowed in any give situation, the options displayed will vary.

The menu is most frequently used from the Design Editor, where it is used to change the colors/textures applied to pieces of furniture. In the Design Editor, the menu is invoked by clicking one of the small color boxes displayed under the name of the current piece at the upper left of the menu.
To cancel out of the menu click the ![]() exit button at the upper right.
exit button at the upper right.
Working with Color
To pick a color using the menu, simply click the one you want, wherever it appears. If you don't see what your want, click More Colors to bring up the standard Windows color selection screen.
When entered from the Design or View Editors the menu includes a checkbox along its lower edge which allows you to do a broadcast change of color/texture on all pieces with the same name as the current piece. This is how you can, for instance, change the linen color of all the 5RT10C (5' round table with 10 chairs) pieces in your design with the click of a button.
Note: It is very rare, but if you have problems selecting colors, see Setting the Screen Resolution
Working with Textures
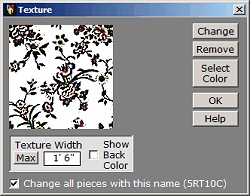
If a texture is associated with the color you have clicked, the menu above appears instead of the color menu. You can add a texture to a piece color by clicking Select Texture in the Color/Texture menu described earlier.
In the Texture Menu:
Change brings up the Texture Selection Menu
Remove removes the texture associated with a color.
Color allows you to set a background color to be a associated with a texture.
Textures can be applied in a couple of ways. The box at the bottom of the Texture portion of the menu controls the process.
Texture Width
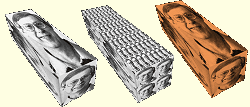
If you click the Max button, the texture is stretched to cover each face, as in the illustration at the left above.
If instead you enter a width, such as 1' 6", the texture is applied as a repeating pattern of the stated width. Sometimes the process works very well, but at other times you get inconsistent results as with the middle illustration above.
If Show Back Color is checked, the color for the pieces if combined with the texture to give the final result, as in the rightmost illustration above. This is especially handy if you are using the "Satin" texture.