|
Selecting Groups of Pieces |
  
|
|
Selecting Groups of Pieces |
|
Watch the Grouping Pieces online video.
See the Working with Groups topic.
Selecting Multiple Pieces
In the Design Editor it is often handy to treat a number of pieces of furniture as a group for purposes of moving, rotating, duplicating, etc. You can create such groups is a couple of ways:
--- select a piece by clicking on it, and then hold the Ctrl key and click on a second piece.
--- click ![]() the Select Group button at the top of the Design Editor menu.
the Select Group button at the top of the Design Editor menu.
In either case, the Group Selection menu will appear:
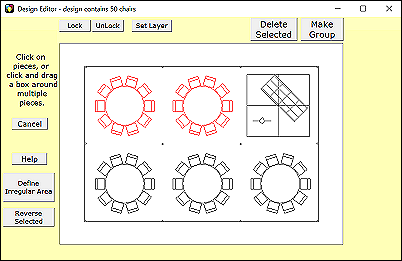
To select or deselect pieces in this menu, just click on them. Another way to select is to drag a box around a bunch of pieces and thus select them all in one operation. Yet another way to select is to use the Define Irregular Area button at the left of the submenu. This is described below.
Another useful button is Reverse Selected which reverses the selected status of all pieces in the design. This appears at the lower left of the menu after the first piece is selected and is occasionally useful for removing "lost" pieces that are messing up the scaling of a design.
Regardless of the method you use, the pieces you have selected are shown in red. If you select something by mistake, all you need do is click it again to deselect it.
Once you have made your selections, click one of the buttons at the top of the menu to tell the program what to do next. You can click:
Lock - to lock the selected pieces in place so they cannot be accidentally moved.
Unlock - to unlock the selected pieces so they can once again be moved.
Set Layer - to specify the layer on which you want to place the selected pieces. See About Layers
Delete Selected - to delete the selected pieces from your design.
Make Group - to temporary combine the selected pieces into a group to make them easier to work with.
This last option is something every PartyCAD user should master, as grouping pieces greatly speeds your design work.
Clicking any of these buttons will cause the requested action to be performed and the Design Editor to reappear. See Working with Groups for what you can do with groups once you have created them.
You can also click the ![]() button at the top left of the menu to return to the Design Editor menu without doing anything.
button at the top left of the menu to return to the Design Editor menu without doing anything.
When you need to make a non-rectangular selection of pieces, click the Define Irregular Area button at the left of the menu to begin. This causes the program to enter a special mode where you can draw an enclosing area on the screen. Such an area might look like this when complete:
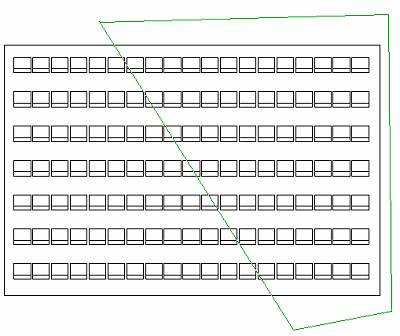
To define such an area:
- Click the Define Irregular Area button
- Click on the screen where the first line of the area is to begin and drag you mouse to make the first line, then release the mouse button.
- Continue clicking and dragging until you have drawn a line nearly around the area you want to select.
- Click the Undo button at the top of the menu to undo if you make a mistake.
- There is no need to draw a line back to your starting point. The program will supply that for you.
Once the area has been defined, click one of the other buttons at the top of the menu:
Select Enclosed - selects pieces that are inside the area you have drawn.
Deselect Enclosed - un-selects pieces that are inside the area you have drawn.
Reverse Enclosed - reverses the selected/un-selected state of the pieces inside the area.
Even using this tool it will often be necessary to click on some individual pieces to get exactly the selections you want.