|
The Tent Wizard |
  
|
|
The Tent Wizard |
|
Watch the Tent Wizard online videos.
Library Assembly Poles Tent Lines
Sidewalls Floor Drip Edge Flags
The purpose of the Tent Wizard is to allow you to easily create and modify tents for use in your designs.
To start the wizard, click on ![]() , the Tent Wizard button. You will find this at the upper-left of the Design Editor. If, when you click this, the currently selected piece is a tent that was created using wizard, that tent will automatically be loaded for editing... this makes it easy to tweak the details of your tent as the design of a party begins to take shape.
, the Tent Wizard button. You will find this at the upper-left of the Design Editor. If, when you click this, the currently selected piece is a tent that was created using wizard, that tent will automatically be loaded for editing... this makes it easy to tweak the details of your tent as the design of a party begins to take shape.
At the right the Tent Wizard menu is a view of the tent. Click down on this and drag left or right to rotate the tent. Sometimes you also be clicking on this view to select something like a side wall or tent line, but we'll get to that later.
The buttons on the navigation bar below the view can also used to change the view of the tent. Labels in this area indicate if some parts of the tent have been hidden, and show the current rotation of the tent. If you have not rotated your tent in the Design Editor, rotating the image in the Tent Wizard to 0 degrees will show it in the correct orientation.
Buttons in the above the picture allow you to return your tent to the Design Editor either as a Changed Tent that will replace an old one in your design, or as a New Tent that will be added to the design.
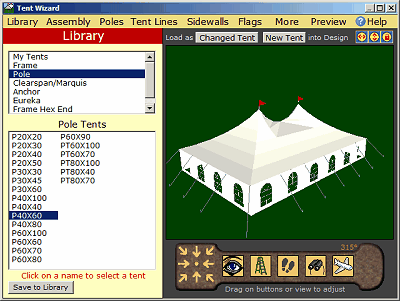
The available panels are listed in the Menu Bar across the top of the menu. Clicking these will change the command panel displayed at the left of the Tent Wizard menu. In the illustration above, Library has been clicked and so the Library panel is displayed.
Clicking ![]() at the top-right will return you to the Design Editor without making any changes to the design.
at the top-right will return you to the Design Editor without making any changes to the design.
Clicking on Library in the list at the top of the wizard screen causes library information to be displayed. The list at the top of this panel allows you to select from the available libraries. The lower list is used to select a particular tent. Whenever you click an item in the lower list, the related tent is displayed. You can modify this using the other panels, or you can click a button above the view of the tent to immediately send it back to the Design Editor.
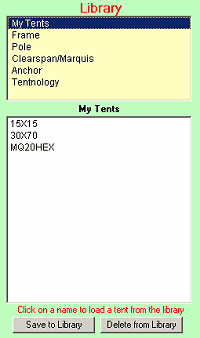
If you do customized a tent, you may wish to save it to a library so you can get it back again quickly another time. To add a tent to a library, click on the library to which you wish to save the tent and then click the Save to Library at the bottom of the Library panel. The My Tents library is a good place to save all your custom tents, since you will then only need to look in this one place to find them.
Tents you have saved to a library can be deleted later through use of the Delete from Library button. This button only appears for tents that you have saved. You cannot remove tents that are supplied with PartyCAD, however you can save a tent by the same name to a library and get your preferred configuration instead of the one supplied with the program.
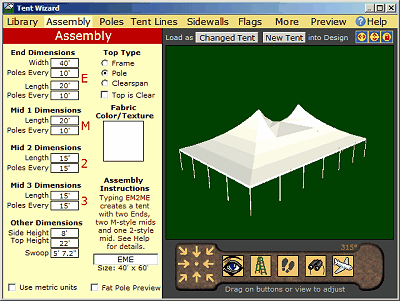
Clicking on Assembly in the Menu Bar displays the Assembly sub-menu. Here you can fiddle with the dimensions and construction details of a tent you have selected using the Library. Watch the Tent Wizard videos for a demonstration of how to do this.
The easiest way to master Assembly is to play around changing some values to see what happens to the tent displayed at the right.
The value in any box can be changed simply by clicking.
Notice the assembly box at the bottom right of the sub-menu. This contains the letters EME which indicate that the tent is to be constructed by combining an End, a Mid and then another End. Other boxes allow you to specify the characteristics of each of these parts. Notice too that the size of the tent is reported below the assembly box.
In the End Dimensions section, you first specify the width of the tent end. For a 40' tent, that would just be 40'.
Next comes Poles Every which is used to specify how often poles appear across the end of your tent. Often this number is 10' but on some tents is may be 7'6" or 15'.
Ends also have a length and so the next two boxes are used to specify the length and pole spacing in that direction. Very often the length of an end is half its width so two ends when combined make a square tent.
The four boxes just discussed determine what happens when an E is placed in the assembly list. In similar fashion, the Mid dimensions sections that come next contain instructions for what is to be added when an M, a 2 or a 3 appears in the assembly list. In the example above, only a single M has been used. If you change the assembly list to EMME there would be two mids added in the middle of the tent, EMMME would give 3, and so on. Entering EM323E would give a tent used three different sizes of mids, controlled by the dimensions you set in the Mid dimensions sections.
Below the Mid Dimensions are some miscellaneous fields:
Side Height controls the height of the side poles of your tent. Often this is 8' or 9'
Top Height controls the overall height of the tent, from the ground to the peak of the roof.
Swoop controls the curvature of the canvas between center poles on Pole tents and is the distance from the top of the tent to the most depressed part of the curve. In the illustration above the swoop is 5' 7". On twin pole tents (set in the Poles menu) two additional swoop parameters will appear that allow you to adjust the swoop of the canvas between the twin poles.
At the top of the second column in the Assembly menu are radio buttons that allow you to select from a Frame, Pole or Clearspan/Marquee style top for the tent. Other types of tents can also be handled by the tent wizard, but with such tents you will not be able to so freely change dimensions, since these come from a particular manufacturer and are pre-loaded into the Tent Wizard.
Color/Texture allows you to specify the color of your tent. With some manufacturer tent you may be able to set different parts of the tent to different colors here.
Fat Pole Preview, when checked, temporarily makes the poles of the tent very fat indeed, so they can easily be seen when working with large tents.
Assembly is the most complex of the sub-menus, but practice a little and you will soon get the hang of it.
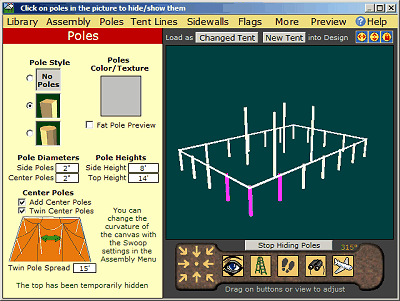
Click on Poles in Menu Bar and the Poles sub-menu appears. This allows you to configure the poles of your tent:
Pole Style allows you to specify no poles, square poles or hex poles for the tent. If you select no poles, all poles will be removed but the top of the tent will still be set so that its base is off of the ground as though the poles were there but invisible. See Pole Heights below.
Pole Diameters allows you to set the thickness of side poles and center poles.
Poles Color/ Texture allows you to set the color of the poles and to perhaps apply a texture to them. This is not the same as placing pole socks on the poles. Pole socks can be added using the Drapes sub-menu.
Pole Heights allows you to set the height of the side and center poles. The Assembly sub-menu can also be used to set these same values, if you prefer.
Add Center Poles, if checked, adds center poles to the tent
Twin Center Poles appears if Add Center Poles has been checked. A twin pole tent has center poles in pairs running down its length.
Twin Pole Spread appears if you check Twin Center Poles. This value is the distance between the twin center poles as indicated by the green arrow in the orange diagram that appears if you click the Twin Center Pole option. Two other values appear on the Assembly sub-menu if you select the Twin Center Poles option. Called Width Swoop and Center Swoop, these control the curvature of the canvas between the center poles.
Hiding Poles
Although you can hide all the poles in a tent with the click of a radio button, there may be situations where you would like to hide just some of them. To do this, click the Hide Some Poles button that appears above the navigation bar and below the view at the right of the wizard screen when the Poles sub-menu is displayed.
Clicking this causes the view to change so it looks like the illustration above -- the poles get very fat to make it easier to select them. In this mode you can click on the poles you wish to hide and their color will change to purple to indicate that they have been selected. You can click again to de-select a pole if you change your mind or make a mistake. Once you have selected all of the poles you wish to hide, click the Stop Hiding Poles button above the navigation bar and the view of the tent will return to normal, except that the poles you have selected will be hidden. Click Hide Some Poles again to re-enter pole hiding mode to make further changes.
Stray Poles -- If you need to add poles in odd positions, the best plan is to treat them as pieces of furniture,loading them in the Design Editor. Use ![]() Load from Album to load a pole from the Tent Pieces page. Such a pole can be sized and placed to handle any special situation that may arise.
Load from Album to load a pole from the Tent Pieces page. Such a pole can be sized and placed to handle any special situation that may arise.
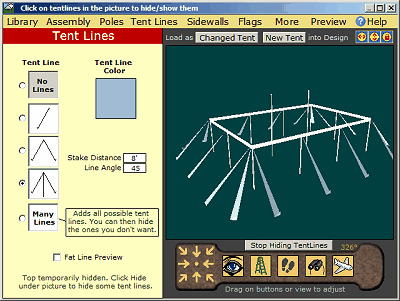
Clicking on Tent Lines brings up this sub-menu, which allows you to configure the tent lines of your tent:
Tent Line allows you to select from various configurations of lines.
Stake Distance is used to specify how far the stake end of each line is from the body of the tent.
At some points on the tent's perimeter, there may be multiple lines radiating from a single point, as with the lines at the corner of the tent in the illustration above. Line Angle allows you to control the angle that secondary tent lines make with the center line. Experiment.
Fat Line Preview temporarily makes the lines into triangles that are easier to view than the actual lines on large tents.
Tent Line Color allows you to set the color of the tent lines. You cannot add texture to tent lines as they are processed in a special way by PartyCAD when they are rendered.
Hiding Tent Lines -- The process of hiding tent lines is much the same as was explained in the Hiding Poles topic above. A Hide Some Tent Lines button puts you into selection mode, where you select the lines you wish to hide. A Stop Hiding Tent Lines button is then used to revert to normal mode and hide the selected lines.
Stray Lines -- If you need to add lines in odd positions, do this in the Design Editor by loading a TENTLINE piece from the Tent Pieces page of the Furniture Album.
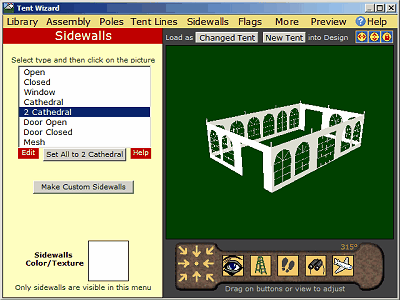
Clicking on Sidewalls in the list at the top of the wizard screen causes the Sidewalls sub-menu to be displayed. This allows you to configure the sidewalls of your tent.
There are two modes of operation:
Simple Sidewalls -- Select an available sidewall element from the list in the Sidewall sub-menu, then click on the view of the tent to apply this element between two poles of the tent. This is how the sidewalls in the illustration above were created. Notice that there are little poles along the top of the tent sides to guide you.
A button below the list of elements allows you to apply the currently selected sidewall element to the entire tent. Often this is a way to speed sidewall set up. For instance, you might click 2 Cathedral in the list, and then Set all to 2 Cathedral. This would add 2 Cathedral sidewalls all around the tent. Now it would be a simple matter to select Door Open or just Open elements from the list and click on the view where you want to cut openings.
The sidewall elements are generic but you can customize them to match the dimensions of your sidewalls if you so desire. Advanced Sidewalls explains how to do this.
Sometimes the sidewalls of a tent do not match up to the poles. In that case you can click the Make Custom Sidewalls button and setup the entire side of the tent using a list of sidewall elements. The procedure for doing this it explained in the Advanced Sidewalls section.
Sidewall Color and Texture allows you to set the color and texture of all the sidewalls. All sidewalls must have the same color and texture.
Clicking on Flags in the list at the top of the wizard screen causes the Flags sub-menu to be displayed. Radio buttons on this simple menu allow you to add various types of flags to the peaks of the tent. A color box allows you to set the color and texture of the flag and dimension boxes control the height and width of flags. As in the Poles menu, a Hide Some Flags button allows you to selectively hide some of the flags if the situation warrants.
More Button - clicking More in the Menu Bar will allow you to select from these additional sub-menus:
![]()
Clicking on Drapes in the list at the top of the wizard screen causes the Drapes sub-menu to be displayed. Radio buttons on this simple menu allow you to add various types of pole drapes or pole socks to your tent. A color box allows you to set the color and texture of the drapes and dimension boxes allow you to set the height and width of the drapes you select. As with Poles, a Hide Some Drapes button allows you to selectively hide some of the drapes/socks if the situation warrants.
Clicking on Floor in the list at the top of the wizard screen causes the Floor sub-menu to be displayed. Radio buttons on this very simple menu allow you to show or hide a floor for the tent. In addition, a color box allows you to set the color and texture of the tent floor.
Clicking on Liner in the list at the top of the wizard screen causes the Liner sub-menu to be displayed. This simple menu allows you to add a liner (essentially an inner roof) below the canvas of the tent. The liner is just a copy of the tent top that has a lower top height. A Top Height box sets the height of the top of the Liner above the floor. To make sense, this value should be more than the side height and less than the top height of the tent. A color box allows you to apply color and texture to the liner.
Clicking on Drip Edges in the list at the top of the wizard screen controls the generation of drip edges for the tent. Radio buttons allow you to select No Drip Edges, Simple Edges and Scalloped Edges. Dimension boxes allow you to set the height of the drip edges and the Repeat Every value for scalloped edges. This second value is just how often the drip edge is to be notched.
Hide More - clicking this entry in the Menu Bar will redisplay the standard Menu Bar selections
![]()
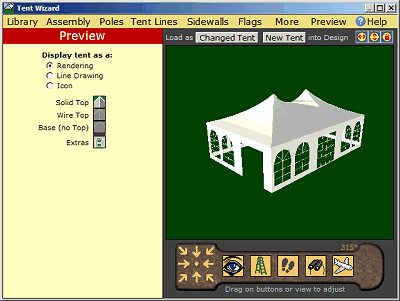
Clicking on Preview lets you preview the completed tent prior to exporting it to the Furnish module and onward to the view generation logic of the program. In addition to this preview capacity, the Preview menu has an Edit Icon button that allows you to remove unwanted lines from the icon of a tent. This is useful when you will be combining a series of tents in your design and you wish to remove the icon lines so as to generate a cleaner result in the Design Editor.
Radio buttons at the top of the menu allow you select the different ways the tent may be displayed in PartyCAD.
In some modes a stack of buttons appears that allow you to show tent tops in a variety of ways
Topics: Special Tents, Attract Button
Special Tents
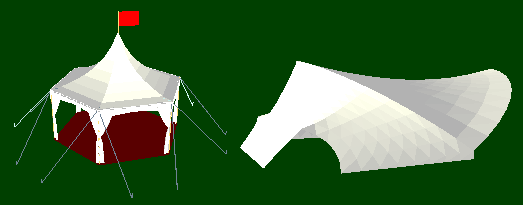
PartyCAD's Tent Wizard is pretty good at making most rectangular tents, but what happens when you need to used a hexagonal or triangular tent, or perhaps assemble a tent structure such as the one at the right above. The Tent Wizard cannot construct such tents, but it can import properly prepared files and manage these, so, though you cannot create a hex tent within the wizard itself, you can still use them if someone has taken the time to create the needed data files. Usually the raw information for creating such tents must come from the manufacturer.
Some such tents behave pretty much like those created within the Tent Wizard. For these you can add Floors, Sidewall, etc. in the normal fashion. Other tents, especially structure tents, are odd birds and such extras may not make sense and so may not be available. It all depends on how the tent was defined to the Tent Wizard and that is not usually under your control.
Structure tents may have certain parts that can be hidden or colored differently than the rest of the structure. The Assembly sub-menu is the place to look for such novel features. If a Hide Some Parts button appears there, you can, for instance, hide some parts of a tent such as the openings for entry in the concert shell tent above.
Attract Button in the Design Editor
Every tent created by the Tent Wizard has some special hidden places called Mag Points. These are so placed that they can be used to align tents in the Design Editor. To use this capability in Design Editor, first click the tent that will be doing the attracting. This is much like selecting the "old current part" for the Jump command. Once you have set the first tent, click on the tent that is to be aligned and drag it close to where it is to be positioned against the first tent. Now all you have to do is click ![]() the Attract button which will have appeared over the Jump button at the left of the Design Editor screen. PartyCAD will do the rest. If the button does not appear, one of the tents involved was created with an earlier version of the Tent Wizard. In that case, all you need do is use the Tent Wizard to resave a more modern version of the tent.
the Attract button which will have appeared over the Jump button at the left of the Design Editor screen. PartyCAD will do the rest. If the button does not appear, one of the tents involved was created with an earlier version of the Tent Wizard. In that case, all you need do is use the Tent Wizard to resave a more modern version of the tent.