|
View Editor |
  
|
|
View Editor |
|
Watch the online videos about the View Editor.
The Control Menu Navigating with Plans The Picture Buttons
The Piece Color Menu Menu Bar Commands
See also: Working with Digital Art
If you select a view in the Page Editor and then click Edit View, the View Editor appears to display a view of your design and provide many ways of modifying it:
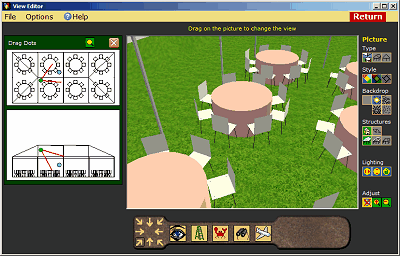
If you click and drag on the picture window, the picture changes as though you were walking through the design. When you release the mouse button, movement stops and your mouse pointer reappears.
The controls below the picture window allow you to quickly change to a different view, and to move though your design in other ways.
The picture buttons to the right of the view control the type of view produced, its style, background, the visibility of structures and lighting.
To the left of the picture, you can click the Show Plans button to display plans of the design marked with dots and lines to indicate the camera position. You can drag on the dots to modify the view.
File and Options in the Menu Bar give access to more advanced options.
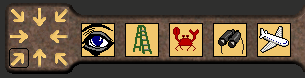
The Control Menu allows you to quickly change to standard views of your data and to move around in your design in ways other than by just walking.
The arrows at the left let you get to any of a number of standard views of your design. Click on any displayed arrow and the view will immediately change to a standard corner or side view.
Getting Unlost - if you ever get lost using any of the other means of navigation, use these arrow buttons to get back to a known point. If the view is all white when you use these buttons, this generally means you are looking at the canvas of a tent... just click and drag up on the picture to enter the tent.
The other buttons in this section allow you navigate through your design in a variety of ways. To use a button, click down on the button and drag with either the left mouse button (LMB) or right mouse button (RMB). Drag on the button! Remember, you drag on the button, not on the view, to access the following modes of movement:
Eyeball - drag the button with the LMB to gradually look right/left or up/down. Dragging with the RMB does exactly the same thing but operates more crisply - jerkily some would say.
Ladder - drag up with the LMB and the viewpoint will rise, drag down and it will sink. Dragging with the RMB is much the same except that as the camera rises it is gradually tipped to keep the view point the same. Dragging up with the RMB on the ladder is a very effective method of movement.
Selecting Items - to select an item in the view, click on it with your mouse. You'll see it momentarily change color to indicate your selection has been noted by the program. You may have to move about a little in the scene to select certain objects, especially if they are inside buildings, or if they are close to people or trees. If the item you select is a light, it will be turned on or off in response to being selected. Some controls, such as the next one, make use of such a selected piece in their operations.
Crab - dragging right or left with the LMB causes the scene to rotate around the last item selected. This is a very useful motion for viewing your entire design, especially if you use the ladder first to gain a little height. Dragging with the RMB causes the view to slide right or left across the picture window. Gamers call this movement a "strafe," and it is useful for traversing the edges of a design.
Binoculars - this button is not much used, and I'd advise you ignore it. Dragging with either mouse button allows you to zoom in or out. When you do this, a red border will appear around the button. If you drag on this you can "eyeball" around in the zoomed in view. Using any other button will automatically return you to an un-zoomed view of your data.
Plane - dragging with the LMB allows you to steer as the camera flies away through the scene. Dragging with the RMB flies you backwards, which is surprisingly handy. To increase the flying speed, press the space bar while flying.
![]() You can also move around in your design by dragging dots on top and side plans of your design. Click the Show Plans button to the left-top of the picture to turn plans on. Something like this will appear:
You can also move around in your design by dragging dots on top and side plans of your design. Click the Show Plans button to the left-top of the picture to turn plans on. Something like this will appear:
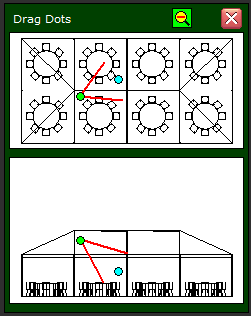
The colored dots and lines on the plans will vary depending on the type of view selected. This is discussed in the next section.
As an experiment, click some of the standard view buttons in the Control Menu. See how the lines and dots change as you do this? If you drag on the picture and cruise around, its just the same. The plans always show the location and orientation of the camera within your design. You can also drag on the dots in the plan view to modify the picture, and some people actually prefer to set up their views in this way.
Sometimes you will want to move a dot further away than is permitted by the size of the plans. The solution is to zoom out by clicking the ![]() button at the top of the plans menu. Click again to zoom out further, or click the
button at the top of the plans menu. Click again to zoom out further, or click the ![]() button to zoom in.
button to zoom in.
You can hide plans by clicking ![]() at the top of the plans panel.
at the top of the plans panel.
The buttons to the right of the view are called the Picture Buttons and give you great control over the views produced by the View Editor. The Picture Buttons are divided into the following sections:
Type
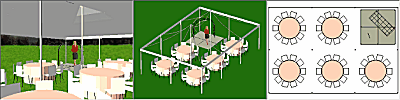
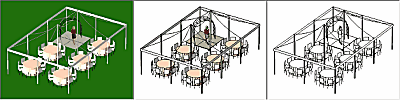
![]() These buttons let you choose between camera, full or plan/elevation type views. Only camera views can have a background that is not a solid color. Clicking the Plan/Elevation button always gives a plan view first, but you can then click the available Standard View arrows to select front or side elevation views of your design.
These buttons let you choose between camera, full or plan/elevation type views. Only camera views can have a background that is not a solid color. Clicking the Plan/Elevation button always gives a plan view first, but you can then click the available Standard View arrows to select front or side elevation views of your design.
Style
![]() These buttons let you choose rendering, rendering with lines or line drawing styles of art. Rendered views are by far the quickest for PartyCAD to produce, and so you may want to explore your design while in rendering mode, only switching to the final style after you have found a view you wish to save. Render with lines creates both a line drawing and a rendered view of the scene. These are combined to produce the result, which can be quite effective for some types of views.
These buttons let you choose rendering, rendering with lines or line drawing styles of art. Rendered views are by far the quickest for PartyCAD to produce, and so you may want to explore your design while in rendering mode, only switching to the final style after you have found a view you wish to save. Render with lines creates both a line drawing and a rendered view of the scene. These are combined to produce the result, which can be quite effective for some types of views.
Background
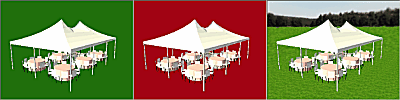
![]() These buttons allow you to easily set the color or image in the background of your views.
These buttons allow you to easily set the color or image in the background of your views.
Only camera type views can have images in the background and you can select from Sun, Cloudy, Sunset and Night. In addition, you can set up any picture as a background by following the directions here.
For solid color backgrounds, click the upper-left Background button and then select a color using the "change background color" button just below it. To select a color, either click on the small X to select any color, or click on one of the four colors that show behind this to select a standard color.

Structures
 These buttons let you flatten a plan or tent, and control the visibility of tent parts.
The top two buttons control flattening. All tents and 3D plans in the design will be reduced to lines on the ground if you click the "flatten plans and tents" button. Clicking "3D plans and tents" will then restore the 3D models of these structures. Often times flattening lets you create more informative overall views of your designs.
The middle row of buttons appears if you have tents in your design and these control the visibility of tent tops. The choices are Solid Top, Wire Top and No Top. As with flattening, the last two buttons often result in more informative views.
The bottom two buttons appear if you have sidewalls on your tents and are used to show or hide the sidewalls. Again, you might want to hide the sidewall to create a better view of the interior of a tent.
Lighting
![]() These buttons control the direction of the sun and manipulate any lights you may have included in your design.
These buttons control the direction of the sun and manipulate any lights you may have included in your design.
In the top row, the left-most button is Sun Rotate, which rotates the sun around the horizon. A cone appears when you drag on this button to assist you in determining the orientation that gives the best lighting for a particular scene. The middle button is Sun Tip and dragging this changes the vertical angle of the sun. The right button is Sun Lock. Clicking this locks the sun position relative to the current view and automatically adjusts the sun to maintain this angle as you move about the scene. This allows you to set up the lighting once, and then forget about it.
The lower buttons appear if you have included lights in your design. Click the left button to turns all of the lights in your design on or off. You can also turn individual lights on or off by just clicking on them in the picture. The right button control the flickering of candles and only appears if candles are part of your design. Click this to turn flickering on/off. Flickering lights take a good deal of processor power and may slow your animations significantly so most people avoid them. See Using Lights.
Adjust
![]() These buttons allow you to temporarily recolor pieces of furniture in your design, to expand the view to temporarily fill the screen or to revert to the standard view size. The Piece Color button is further described in the following section.
These buttons allow you to temporarily recolor pieces of furniture in your design, to expand the view to temporarily fill the screen or to revert to the standard view size. The Piece Color button is further described in the following section.
Click ![]() to display the Piece Color Menu. Click on the piece to be re-colored and the following menu will appear:
to display the Piece Color Menu. Click on the piece to be re-colored and the following menu will appear:
![]()
This menu allows you to adjust the coloring of pieces temporarily. Because the changes are just temporary, this is a rarely used feature of the program.
To Change Colors:
Click on any color in the color bar and then select a new color from the Color/Texture Menu to replace it. The changes you make will be immediately applied to the picture window. If Color - This Piece is selected only the selected piece will be affected, if Color - This Type all like named pieces will be re-colored. If Color -This Color Everywhere is selected, the old color will be changed to the new one throughout the scene.
Note 1: Changes made here are temporary. That is, they are not stored in your data files and will be lost when you leave the View Editor. To make permanent changes, use the the Design Editor to modify the colors of pieces.
Note 2: Black is often one of the colors shown. This represents the color of the lines that are part of many pieces of furniture. Normally, you would not wish to change this color.
Note 3: As part of the color menu, you can set a texture to be applied to a piece. This works fine, except that setting the "texture width" will not have an effect within the View Editor. The "texture width" value set in the Design Editor will always take precedence.
![]()
File
Save As JPG - saves the picture as a .jpg file that can be used as an email attachment or by word processors and publishing programs. The saved image will be exactly the same as that displayed on the screen.
Copy to Clipboard - copies the picture as a bitmap to the Windows clipboard.
Options
Picture Shape - allows you to set the shape of the picture window.
Show Labels - checked by default. If you uncheck this option, labels added to your design in the Design Editor will be not be displayed as part of views.
Show Textures - checked by default. If you uncheck this, only colors and not textures will be used in rendering the scene. This may help performance when viewing very complex designs
Show Advanced Controls - displays a menu of additional view controls. These my be useful in some complicated situations, but there is a learning curve involved in using them.