|
Price Catalog |
  
|
|
Price Catalog |
|
Check all parts and price lists that you produce with PartyCAD - see Disclaimer
Most people will never have a need to use this menu, as PartyCAD automatically maintains its catalog based upon actions that you take in the List & Price menu. Still, there is one in every crowd, and the Price Catalog menu is there if you need it. This menu allows total control over the Price Catalog that PartyCAD uses to produce price and parts lists. I suggest you read all of what follows to make the somewhat complicated process of manually modifying the Price Catalog as easy as possible.
The Price Catalog menu allows you to manage the database that PartyCAD uses to create pricing and parts lists. After installation, the catalog contains about 200 entries that allow the standard table and chair combination pieces, and the pipe and drape booths to be correctly split into their component parts for listing/pricing purposes. The Price Catalog ships with all prices set to $0.
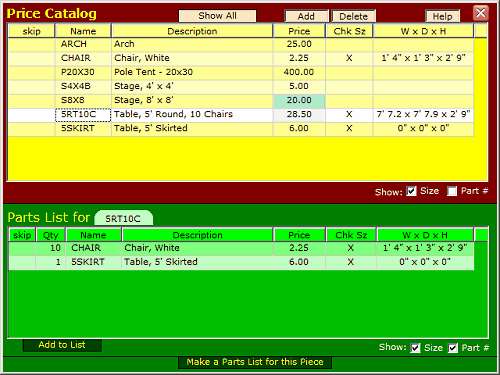
Look at the illustration above. The white line, second from the bottom, for the piece named 5RT10C in the yellow Price Catalog list has been selected. This caused the lower green list to appear, which shows that a 5RT10C is split into 10 chairs and a 5' Skirted Table for pricing purposes.
The Catalog Data Fields
The best way to think of the Price Catalog is as lines in a list, where each line contains the following columns:
Skip - marked if the named piece is to be skipped in lists. An exit sign might be something that is skipped if it is already on site and only included in an arrangement for purposes of clarity. Also, see the technical notes at the bottom of this section for information about another mechanism that causes pieces to be skipped. Double-click the box to mark/ unmark the Skip field for any entry.
Name - This is the short name for the piece, the same name that appears at the upper left in the Design Editor as you load pieces. You cannot change the Name field. You can, however delete an entire line from the catalog as explained below.
Description - This is a longer name for the piece, initially derived for most pieces by PartyCAD reading the piece catalogs. You can change this name to suit by double-clicking.
Price - this is the unit price of the piece. If the price is shaded blue, it is a derived price, based on the unit prices and quantities of its parts list (see below.) If such is the case, you cannot directly change the price. If the price is not shaded blue, double-click to make a change.
Chk Size - marked if the program is to check the size listed in the next field against the size of the piece in your arrangement. If the sizes do not agree, a Wrong Sized Pieces Report will be generated in the List & Price menu. Double-click to mark/ unmark the Chk Size field for any entry.
WxDxH - this is the size of the piece. See Chk Size just above. You can double-click to change the size in this field, but it is generally better to let PartyCAD do this by deleting the original entry and then letting PartyCAD add a new version as describe below under Adding Pieces the Easy Way.
Part# - here a part number can be recorded for synchronizing PartyCAD catalog information with other programs. Double-click the Part # field for any entry to change it.
Parts List - a list of the pieces and quantities that a piece is broken into for pricing/ listing purposes. This list is displayed below the yellow Price Catalog list, and can be modified as described in the Parts List section below. Also see Price above.
Working with the Lists
The lists are quite flexible. Click on the Name in the column header of the list, and the list will be sorted into alphabetic order based on the Name field. Click there again and you will get reverse alphabetic order. This works with any of the fields shown in the list, though the Name and Description are the columns make the best sense.
The dividers between the words in the column header can be dragged to change the width of the columns. This is helpful if you are dealing with long names.
Check boxes below the list allow you to hide/ show the Size and Part # columns.
A scroll bar appears if the displayed list is a long one. Sliding this allows you to quickly browse the relevant part of the catalog.
Other Buttons Related to the Price Catalog
Show All / Show Selected - these buttons appear above the Price Catalog list when you come from the Prices/Parts List menu. Selected is just a list of the pieces involved in the current list of pieces. Show All causes the entire catalog to be displayed in the list box.
Add - You can add a piece manually to the Price Catalog by clicking this button, but generally you will want to let PartyCAD do this for you. See Adding Pieces the Easy Way
Delete - clicking on a line in the Catalog selects that line. You can then click the Delete button to delete that entry from the catalog, except for pieces that are in the parts lists of other pieces. Such pieces can only be remove once you have deleted them from all of the parts lists in which they appear.
Save - PartyCAD generally saves the Catalog automatically as needed. This button will only appear if you get to the menu by clicking Options > Price Catalog > Edit Entire Price Catalog from the Start Menu.

As explained above, clicking on a piece with a related parts list in the Price Catalog list (the ones with blue prices) causes the Parts List for that piece to be displayed. This list box works pretty much as the one already described. The only addition is a Qty field that allows you to set a quantity for a particular kind of part. Thus the 5RT10C piece splits, for pricing purposes, into 10 CHAIR pieces and 1 5SKIRT piece.
You can delete a line from the parts list by clicking on it, and then on the Delete from List button which will appear below the list.
You can add pieces to the list by clicking the Add to List button that is always available. This is the way parts lists are created for pieces in the Price Catalog -- more on this below.
A piece in a parts list can itself be split into another parts list, where a further part can itself be split --- up to 5 levels deep. Tabs above the Parts List list keep track of this process and can be clicked to return to a higher level in the list. Note however that a parts list cannot be self referential --- a part in a parts list cannot be split into a list that contains itself. This is complicated to explain, but don't worry, the program checks for such mistakes and will warn you if you attempt it.
Adding Parts to a Parts List
When you click Add to List, a menu similar to the one below will appear:

The items shown in pink in such a list are already part of the Parts List for a give piece, and clicking them will cause the associated part to be removed from the list.
The part shown in dark gray in such a list is the piece you are constructing a list for, and cannot be added to the Parts List.
You can click on any of the other pieces shown to add them to the parts list for the piece named at the left of the Picker List. You can change quantities, descriptions and prices in the green Parts List that still appears below the Picker list.
Normally only the pieces in the current selection list will be shown, and this is quite handy if you are Adding Pieces the Easy Way. If you need to add a piece that is not listed, click the Show All button to examine the entire Price Catalog to find the piece you want to add. You can only add pieces that already exist to Parts Lists, and so it is good to make sure the needed parts have been added to the Catalog before you begin.
When your Parts List is complete, click the List is Complete button to save your changes and remove the Picker list from the screen, or click Cancel Changes to abandon the changes you have made and return to the original Parts List for a given piece.
The best and easiest way to add new pieces to the Price Catalog is to just use them in a design and then price that design using the List & Price menu. Any items you change there will automatically be added to the PartyCAD Price Catalog. The only time this is not enough is when the new piece must be split into a parts list for pricing purposes. Even then, if you manage things correctly, the process is not too painful. Let's look at the best way to handle such a situation:
1. Make the new piece of furniture in the Design Editor and give it and its parts distinctive names.
Let's suppose you want to make a 12' round table with 16 chairs around it and a fish tank on top. To do this you might load a 5' round table and resize it to have a diameter of 12'. You should also change the name of this piece from 5SKIRT to something like 12SKIRT.
Next you would load a BOX, rename it FISHTANK, size it correctly and place it on top of the table.
Finally you would load and position 16 chairs around the table. There is no need to rename these since they are just the normal chairs you always rent and thus the piece price is already in the catalog.
The next step is to save this arrangement as a single piece. You might call it something like 12RT16CFISH.
Once you have done this, load a 12RT16CFISH piece from your custom furniture library, and you are set to proceed to the pricing phase. Notice that the arrangement contains not only the finished piece, but also its component parts. This is what will make adding it to the Price Catalog a relatively easy proposition.
2. Click the Price/ List button at the right side of the Design Editor to bring up the List & Price menu.
You will see the following pieces: 12SKIRT, FISHTANK, CHAIR and 12RT16CFISH. Fill in the descriptions and prices for the new pieces. This will cause them to be automatically added to the Price Catalog. If there was no parts-list to worry about, we could stop here, but no. We need to specify a parts list for the 12RT16CFISH piece so…
3. Click the Edit Catalog button to bring up the Price Catalog menu and add any needed parts lists.
Continuing with our example, click Edit Catalog and when the Price Catalog menu appears, click on the 12RT16CFISH piece in the yellow list to select this as the current piece. Now click Add to List at the bottom of the menu, and then from the Picker list select 12SKIRT, FISHTANK and CHAIR as the parts. Change the quantity of the CHAIR piece to 16 and then click List is Complete. Close the Price Catalog menu and the List & Pricemenu will reappear. If you have made the parts list correctly, this list will now show twice the number of items that it did a minute ago, but no 12RT16CFISH piece at all. This is because you have the original parts plus ones added from the Price Catalog based on the parts list you have just entered for the 12RT16CFISH piece.
Whew. It is complicated, but with a little practice you may get on to it.
It is probably best to make a backup of the Price Catalog before you begin, at least until you gain confidence with the procedure. Read on to learn how you can do this.
Technical Notes:
If you plan to make extensive changes to the Price Catalog, you should back it up before you begin, and as you proceed, just so you have a fallback position if problems occur. The Price Catalog is stored in a file called Pricing8.dat that is located in your Global Data folder. Typically the path to the file is:
...\My Documents\My PartyCAD Files\_Resources\Global Data\Pricing8.dat
As an aside, using Manage Locations in the Start Menu, you can tell PartyCAD to place User Created Resources (such as the Price Catalog) on a server rather than in you local drive. That way any changes made to the Price Catalog will be immediately available to all legal users of PartyCAD at your site.
While we are on the subject of files, another that may be of occasional interest to some users is the NoPriceList.txt file, which contains a list of the names of pieces that PartyCAD will always skip when preparing lists. The file is typically located at:
...\My Documents\My PartyCAD Files\_Resources\Global Data\NoPriceList.txt
and can be edited with any text editor should the need arise. By default, the names of all PartyCAD people, trees and hills are included in this file, since they are always non-chargeable items. Note that this list is in addition to the capability of marking a piece as Skip in the Catalog, though the effect is exactly the same.